 Epic7DB
 Early Game - Road to Wyvern 13
The early game will be focused on getting through the bare minimum of story and working towards clearing W13. Wyvern is the primary place you will be farming gear to put on your units.
We focus Wyvern over the other hunts because Speed Set is the most universally usable set. This makes it the best to farm early game since it’ll let you build a lot of units despite only farming one location.
Wyvern is also very easy to clear with free units and free gear. There are a bunch of things you can do while working towards Wyvern however, all of which I’ll explain in order of unlock.
New Player Check-In
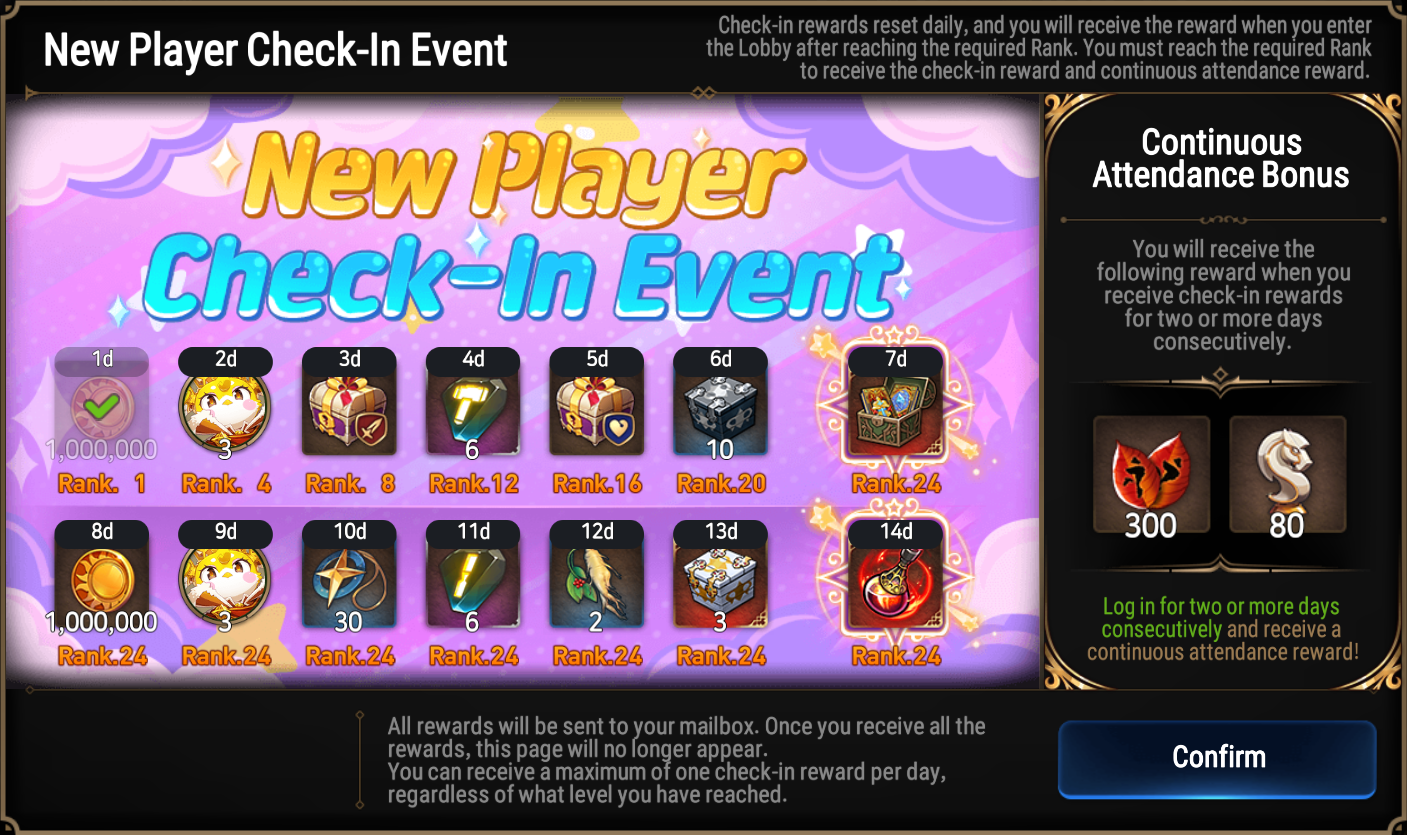
You’ll get this popup when you first open the game. The Rank requirements don’t need to be stressed about, you’ll get them naturally just from playing the game. The important items here are on Day 3, 5, 6, 7, 13, and 14.
Day 3 gives an Atk Set which you should level and use on your main DPS (Free Spirit Tieria). Day 5 gives an HP Set which is worth leveling and should be put on your main tank (Montmorancy). These sets are the first two sets of usable gear you get so they can be instantly maxed and you should try to save resources to enhance them. They will also carry you through nearly all of the early game.
Day 6 and 13 give catalyst selector boxes, materials you’ll need to enhance your units skill and awakenings. Day 7 gives a 5 star Hero and Artifact ticket. Day 14 gives an item that instantly promotes a unit to 6 star which should be used on Montmorancy.
Adventure
After the Selective Summon, you’ll want to progress through Adventure, making sure to 3* every stage along the way. If you’re struggling to meet a star requirement due to a required element or class, you should consider using a 2* hero. You’ll want to clear every single stage with 3 stars as it gives you skystones(SS) and Molagora.
Continue pushing Adventure until you clear Ep2 4-10. The stages should be able to be cleared pretty easily using some of the free units provided and eventually the gear from the New Player Check-In. Some of the bosses might potentially give you trouble, in which case you should ideally abuse strong friend supporters to clear any bosses.
You can ask for people to help carry you in the #friend-finder channel in the Discord or if you know people who play the game you can ask them as well. Another method is to first customize your profile a bit: set a name, change your status (can put something mentioning you’re looking for supporters for Story), set a Rep Hero that isn’t Ras, set a Lead supporter that isn’t Ras, and maybe make a fun profile card. Next, go to the Friends tab via the menu top right, type in any two letters, tap Search, and start sending friend requests to level 70 accounts until you hit the cap. If this isn’t an option, then go back to clear any stages you haven’t gotten 3 stars for yet and once that is done you can just farm the highest stage you can clear for EXP.
After this you’ll start preparing for Wyvern, the primary place to farm gear for your units. You will unlock various new content along the way which will be explained in their respective sections below.
Adventurer’s Path
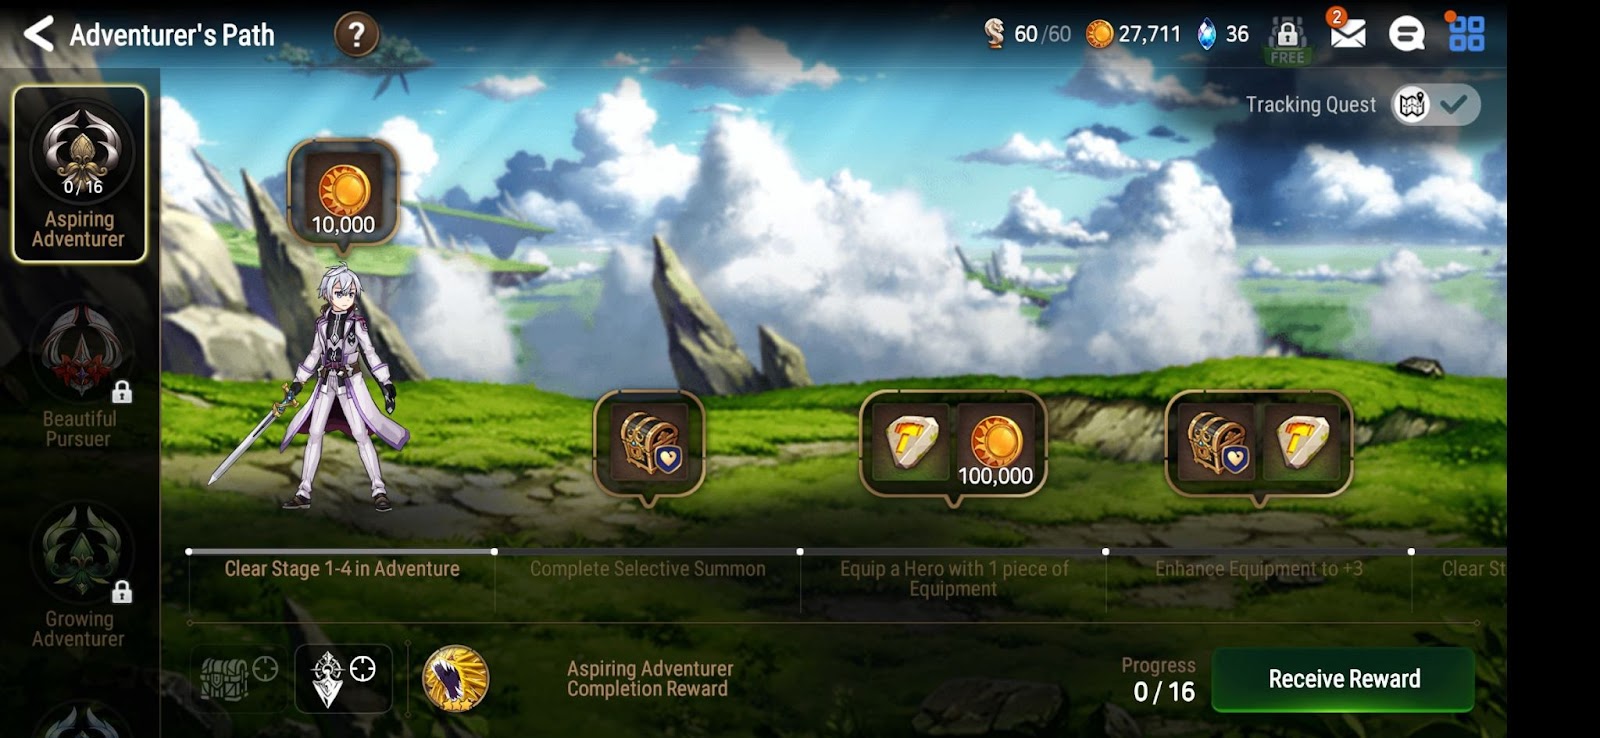
Adventurer’s Path is unlocked after clearing Ep1 1-3. You will first unlock 4 paths that are interconnected, with the second path being unlocked after completing the first and so on. Note that within each path, you can clear the missions in any order. You’ll be unable to claim the rewards until you do the previous missions but the progress will be counted. However, this does not apply to the paths that are locked, so you should try to clear the paths since the missions are pretty easy.
One thing to note is that you don’t actually get any gear that’s any good until Day 3 of the New Player Check-In, so you can either wait until then to do the gear enhancement missions or just enhance some low level gear which shouldn’t cost much to enhance.
There is another Adventurer’s Path, Achieving Adventurer, which is unlocked after clearing Ep1 10-10. There are no other connected paths to this one so you don’t need to worry about rushing to complete it. This path will make you farm some hunts that don’t help your progression much, Golem and Banshee, but they are easily completable by just using whatever units you have. If you want more details you can navigate to the Mid Game section of this guide and find the respective hunt’s section.
A couple of important things to note: First, the Double Rune scroll (acquired after completing a Specialty Change) will be automatically activated if claimed. Wait for a Double Rune buff event before claiming it to maximize runes gained. This also applies to the exp scrolls, where you can wait for an AP buff event instead. Second, you can claim rewards further down the path without claiming every single reward (just tap on them individually instead of pressing the “Claim Reward” button). The energy rewards can be left unclaimed if you want to save them for a buff event.
Connections
Connections are unlocked after clearing Ep1 1-3. This is where you can acquire units for free by completing certain missions. Each unit in the Connections also has a requirement you have to meet before you can start working on their missions.
I’m only gonna mention the connections that actually matter.
-


Free Spirit Tieria
 Light Warrior
Free Spirit Tieria (FST): Unlocked after clearing Ep1 1-3. FST will be your primary farmer for pretty much the whole game.
Farmer means she is able to instantly clear the first 2 waves of a stage before taking out the boss in wave 3. This is important because you’ll be clearing a lot of stages when farming materials to upgrade your units and having a unit that can do this quickly will make things a lot easier.
She should be your primary damage unit up until you start doing Wyvern, so give her the free level 75 Atk set from day 3 of the New Player Check-In Event.
She also has her own personal Adventurer’s Path called Beautiful Pursuer. This will give you some of the materials needed to enhance FST and works as a pretty good tutorial for upgrading your units.
Aside from the free unit enhancement materials, the equipment set given at the end of the path will be used for Wyvern later.
-


Montmorancy
Ice Soul WeaverMontmorancy (Momo): Unlocked after clearing Ep1 1-10. Momo will be your tank for Wyvern and your healer for most of early and mid-game PvE content.
After you clear Ep1 10-10, she’ll be able to undergo a Specialty Change (SC) which turns her into Angelic Montmorancy (AMomo), improving her skills and stats.
This is further explained in the Specialty Change section.
You’ll want to start leveling Momo once you complete her connection and give her the free level 75 HP set from day 5 of the New Player Check-In Event.
-

Furious
Ice RangerFurious: Unlocked after clearing Ep2 3-10. Furious is an irreplaceable part of your early Wyvern team.
He is the primary debuffer and a mandatory pick-up unless you hate men.
Gnolls can be farmed at Ep2 3-S4.
-

Alexa
Ice ThiefAlexa: Unlocked after clearing Ep1 1-10.
You only need Alexa if you lack other options for Wyvern later so there’s no need to unlock her immediately.
Her usage will be explained in the Wyvern section later, just noting that she’s kind of useful.
-


Lorina
Dark WarriorLorina: Unlocked after clearing Ep1 6-2.
Not a priority for early game, but she has a SC which turns her into Commander Lorina (CLorina) and she becomes a great DPS for Raid, Abyss and Fire Expedition.
Church of Ilryos Devotees can be farmed at Unrecorded History 12, 13, or 22.
-


Bomb Model Kanna
Fire RangerBomb Model Kanna (Kanna): Unlocked after clearing Ep3 2-8.
She’s not a priority and can be skipped completely since she’s only a slight upgrade over Mercedes in PvE.
She’s useful for Azimanak and Earth Expedition if you choose to farm her out.
Floating Machinery can be farmed at Ep3 6-2 for 6 kills per 8 energy, or at Ep3 2-8 (Labyrinth stage) for 9 kills per 10 energy.
Sanctuary
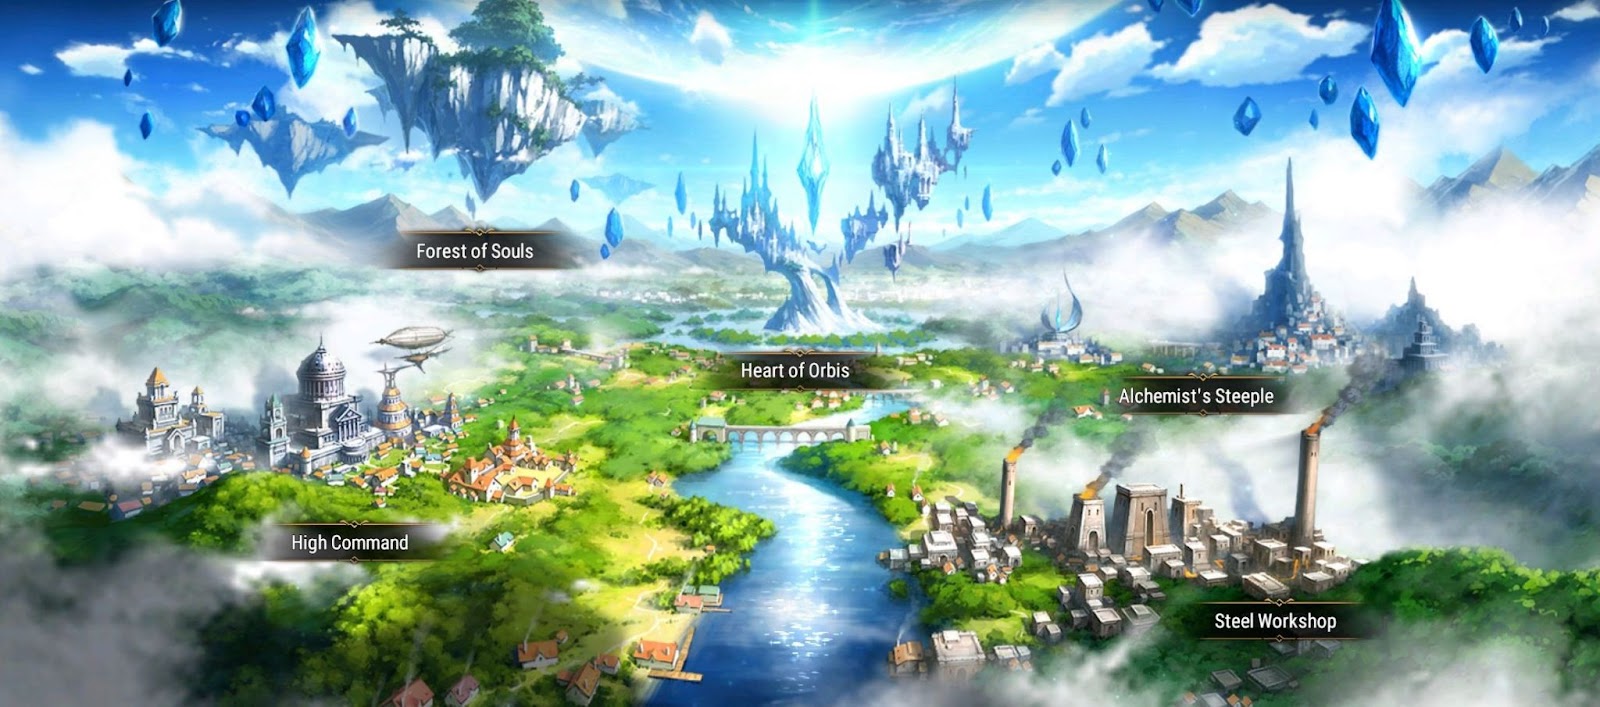
Sanctuary is unlocked after clearing Ep1 1-10. Each location has 3 different categories which can be upgraded up to 3 times using Breath of Orbis. These are acquired by clearing specific stages or from certain shops. Upon acquiring your first Breath of Orbis, it will be forced into the Heart of Orbis. The rest of your Orbis be assigned as follows:
3/3/3 Forest of Souls
-
Finish the right side before summoning blooms
-
Finish the left and right side before summoning penguins
1/1/1 High Command
-
Choose the 1 energy missions that reward Conquest Points and Ancient Coins.
2/3/3 Heart of Orbis
-
Can do 3/3/3 Heart and 2/3/3 Forest instead if you want a 12h timer
0/3/3 Alchemist’s Steeple (finish the right side before making anything)
-
Don’t make anything until you finish the right side
-
Keep a stock of Mana Drake Claws for Guild Aid
3/3/3 Steel Workshop (max this out before crafting gear)
-
Max this out before crafting gear, and don’t make gear below level 85
Where the numbers denote how many Breath of Orbis you should invest into each location’s category.
Breath of Orbis can be found whale progressing Episode 1, Unrecorded History, and Episode 2. The Episode 2 ones are in the AP shops, so you’ll need to complete the missions first and spend 250 per Breath of Orbis. They can be found in chapters 1, 3, 5-1, 6, 8, and 10.
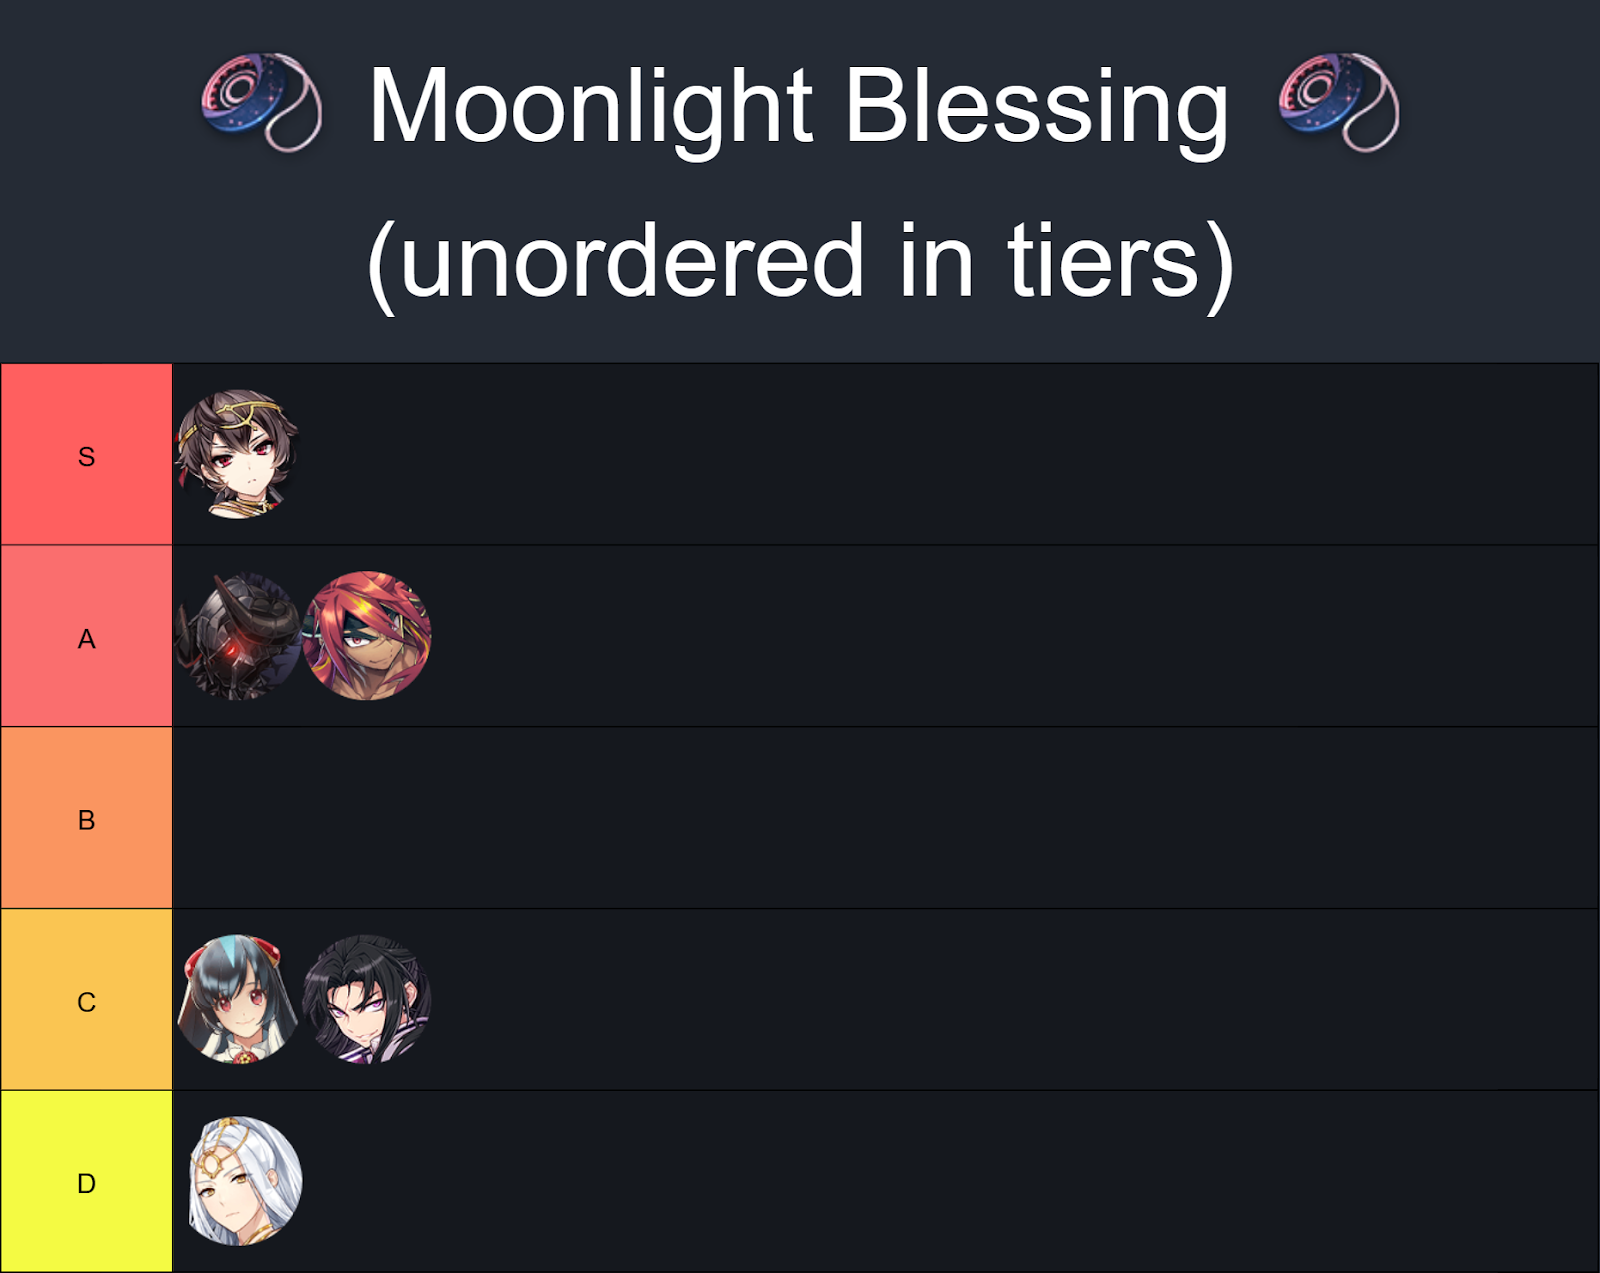
Moonlight Blessing

Moonlight Blessing is unlocked after clearing Ep1 1-10. This provides you with a free ML 5* with a choice between 6 units. The best choice is Specter Tenebria (STene) and it’s not close. STene is better than all the other 5 options in both PvE and PvP. She is a very strong DPS, scaling well from mid game through late game. If you want to know more about the Moonlight Blessing units you can check the Moonlight Blessing section of this guide for a quick writeup. If you’re here looking for the Fallen Land Moonlight Blessing then go to the “Moonlight Theater” section in “Mid Game”.
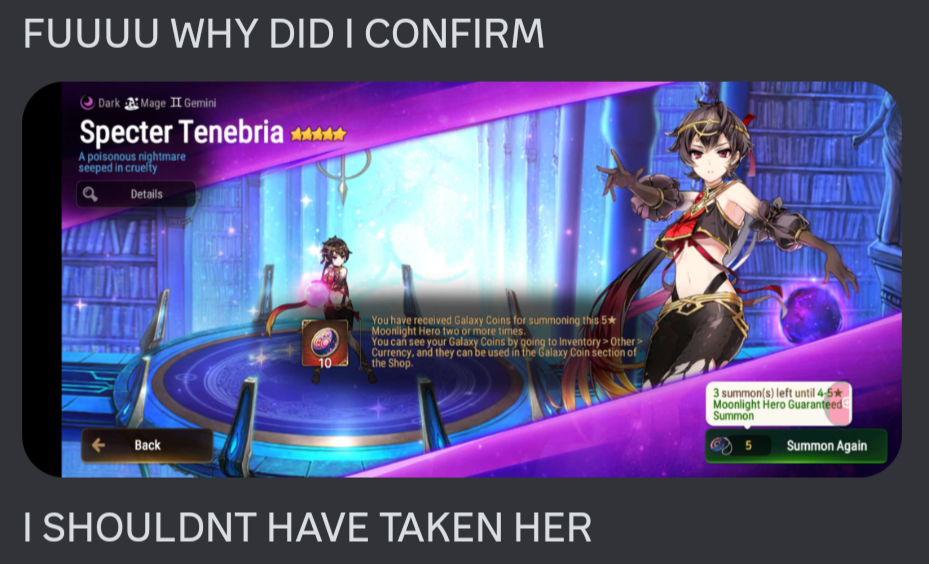
After you complete all 4 missions, there will be a final button to press before you fully summon the unit. It’s recommended to not do this until you absolutely need to so that you can swap to a different ML5 if you happen to roll STene. For the same reason, don’t select a different ML5 and swap to STene later because you only get 1 swap. None of the missions really need to be rushed as you’ll do these things naturally and the Arena mission doesn’t really unlock anything useful for you since STene isn’t great on defense.
Don’t be like this guy.
Arky’s 7 Day Growth Guide
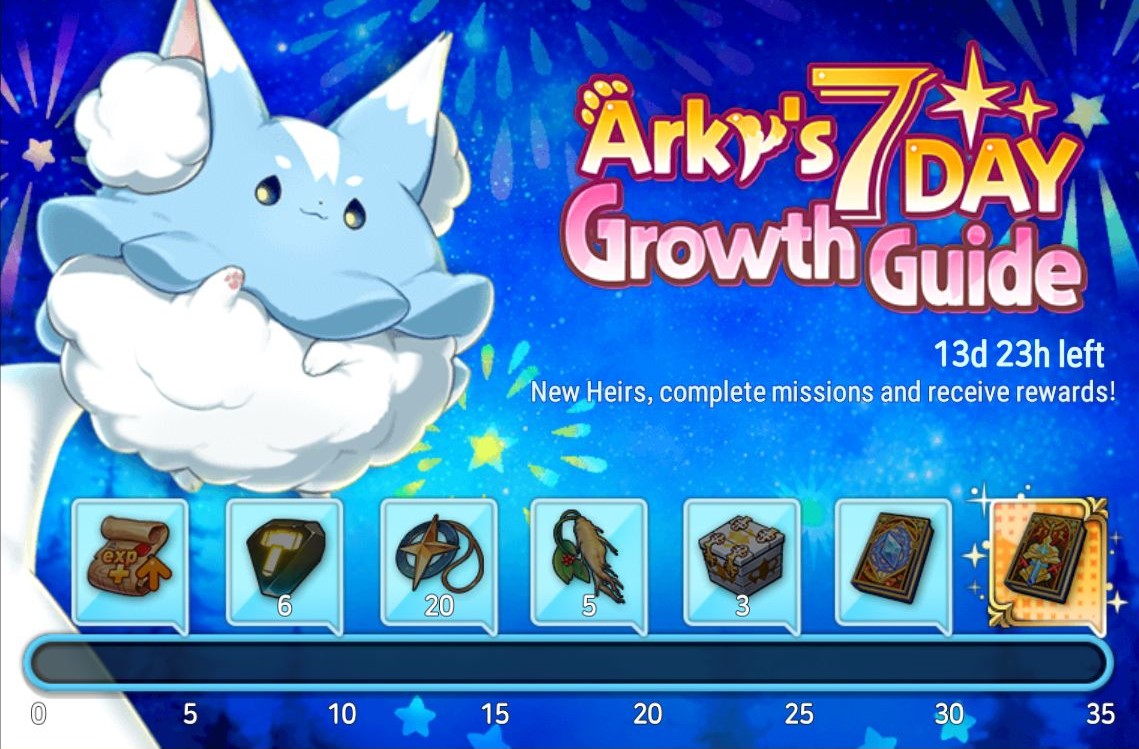
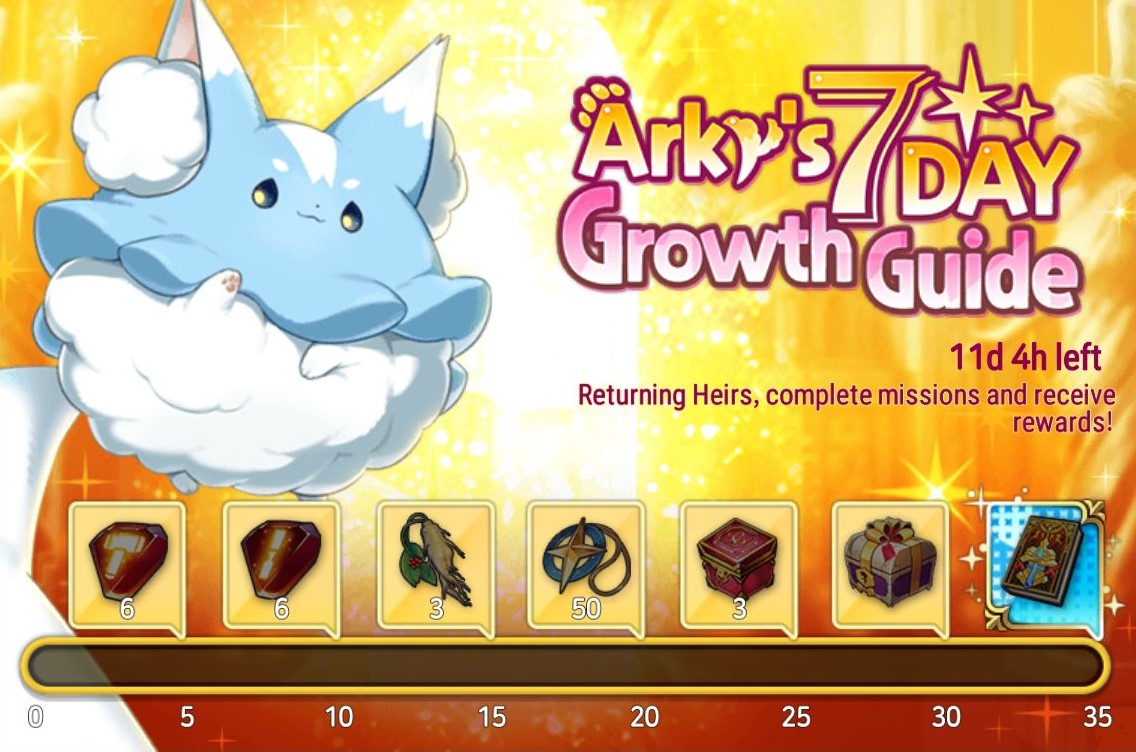
Arky’s 7-Day Growth Guide unlocks immediately once you start the game. You have 14 days to clear all of the tasks and claim the rewards. Each of the first 7 days will unlock a new set of rewards, though the tasks can be completed before they are unlocked. There’s also 2 versions of this, one for new players and one for returning players. The tasks that they ask you to do are really easy to do, so there’s no need to stress about it or anything.
Returning Players only. The only task that might be difficult is “Get an A rank in Hall of Trials” if you didn’t progress very far before quitting initially. For this I’d recommend trying to build up your Wyvern team, or whatever units you’re building next, as much as you can and then seeing if you can get an A rank in the last few days. If it’s a rotation with a hard boss or bad modifiers then unlucky.
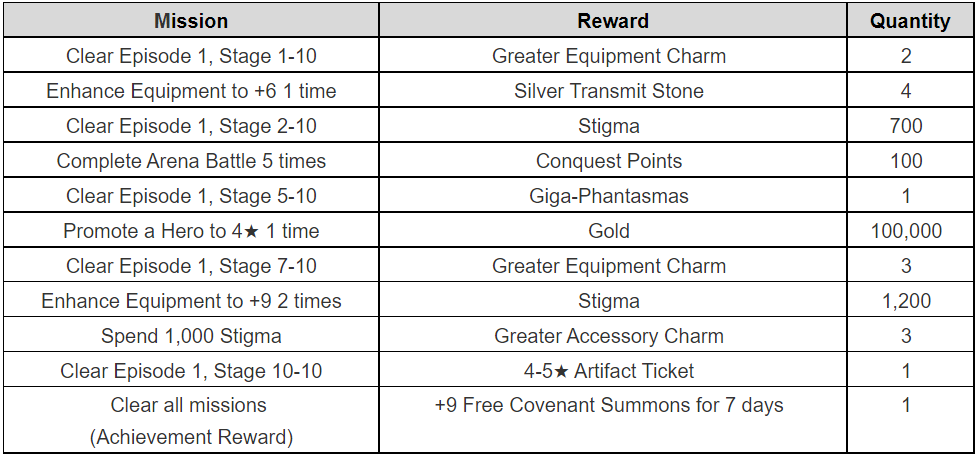
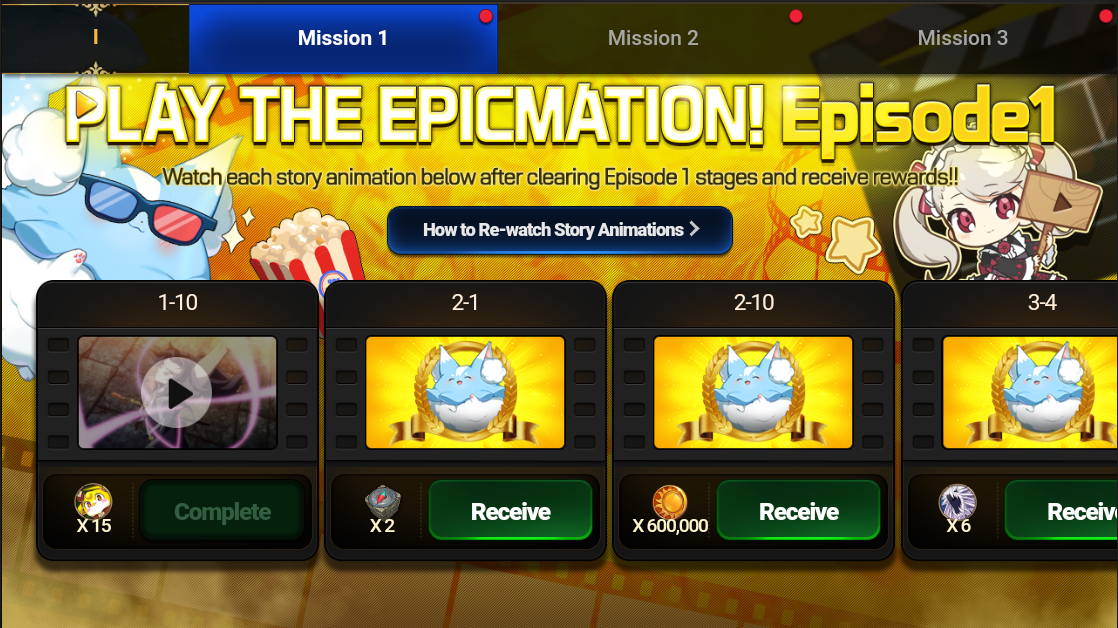
The Call to Adventure
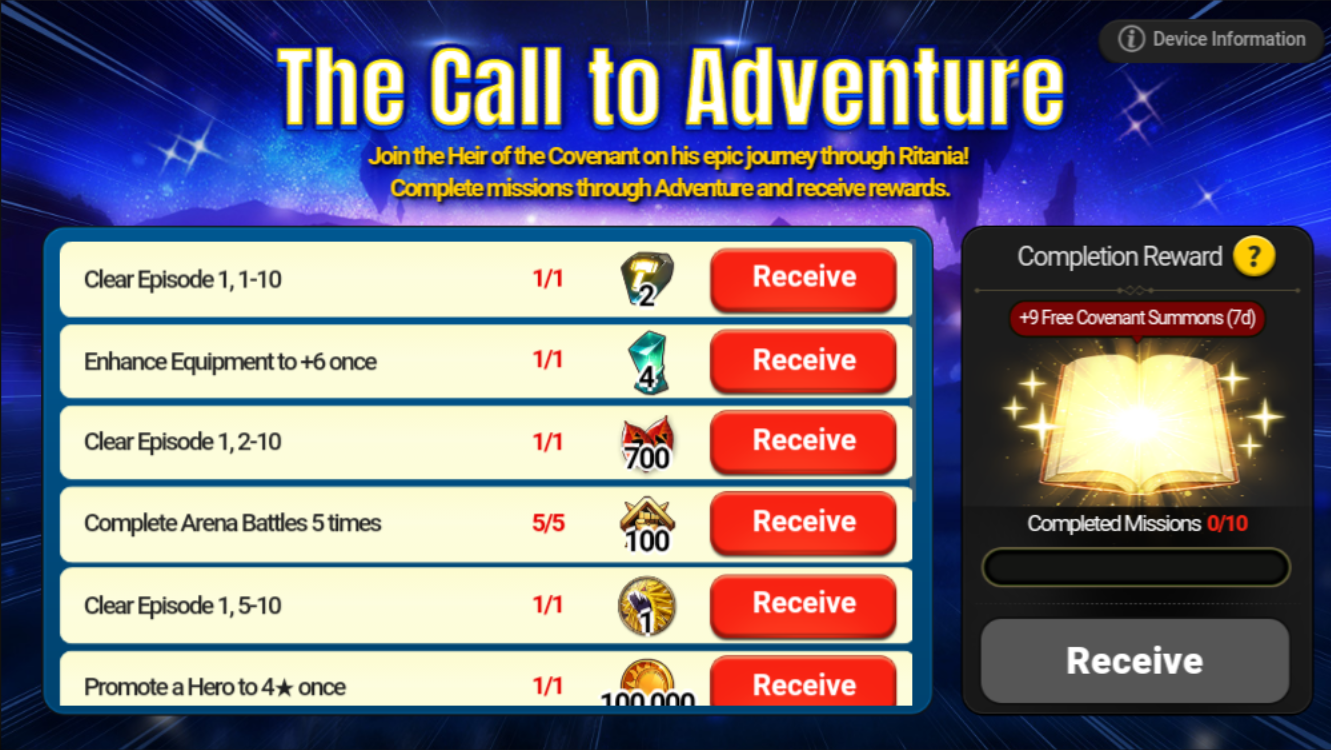
Call to Adventure is unlocked after clearing Ep1 1-4. This is a permanent web event that provides you with free rewards as you progress through the game. None of the missions are particularly hard to do. The other mission rewards not shown in the picture are below.
Adventure for New Heirs
Adventure for New Heirs is unlocked after clearing Ep1 1-10. This is a permanent web event that provides you with rewards as you progress through the game. The missions are pretty simple, you’ll clear them naturally as you progress through Episode 1, Episode 2, and Unrecorded History. Despite what the last Episode 2 missions say, do not actually purchase the Epic Equipment, it’s pretty bad. Just buy the Breath of Orbis and catalysts instead. You can see the full list of missions here.
6* Promotion Celebration Check-In Event

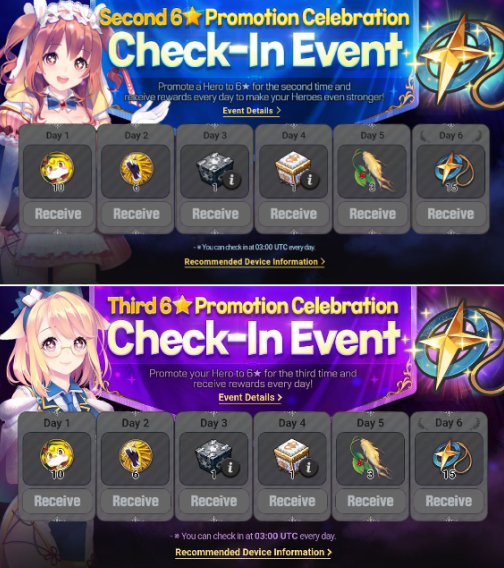
Day 3: 1 15x Rare Catalyst Selector Chest (a single chest that gives 15 of the same catalyst)
Day 4: 1 10x Epic Rune Selector Chest
The 6 star Promotion Celebration Check-In Events are unlocked when you promote a unit to 6 star for the first time. They can be found in the web events section, though the second and third events are locked until you promote a unit to 6 star for the 2nd and 3rd time. The events are permanent so there is no need to rush promoting units. Once you promote a unit to 6 star, you must open the event tab each day to unlock the next reward. Reset time isn’t the standard server reset time, it’s at 3:00 UTC. The event page lasts until you claim all of the rewards. If you want to save inventory space, you could leave the yellow dogs in there until you need them.
Labyrinth

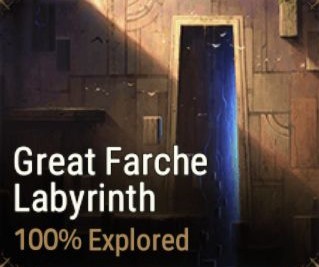
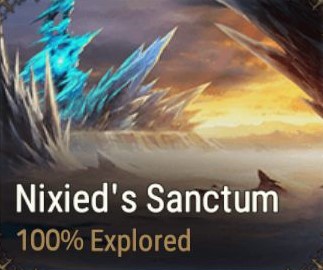
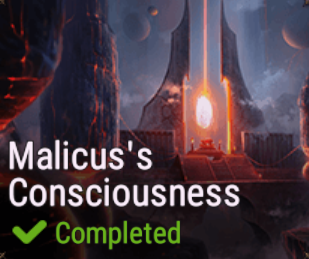
Labyrinth is unlocked after clearing Ep1 1-10. At the start, only Tirel Castle will be available. Great Farche Labyrinth unlocks after you defeat Clarissa in Area 4 of Tirel Castle. Nixied’s Sanctum unlocks after you defeat Celestial Mercedes in Area 5 of Great Farche Labyrinth. Malicus's Conciousness unlocks after you defeat Elisia of the Ice in Area 5 of Nixied’s Sanctum.
Labyrinths can be entered using Labyrinth Compasses, which are acquired naturally at a rate of 1 per day. Each entry into the above labyrinths costs 1 compass per entry. Do not purchase any compasses with Leifs.
You can find Vagrant Merchant Huche, who sells charms, Cov bms, and catalysts (you can ignore the rest). He is in a specific spot per stage and does not move. The easiest place to find him is here in Tirel Castle Area 1 or here in Tirel Castle Area 4. You should check this location every day since his stock refreshes and purchase what you can. After you purchase the items, make sure to Yield instead of exciting via a portal.
In order to unlock the next Area in each Labyrinth, you will need to complete the previous Area first. Make sure you exit through the portal that actually leads to the next Area instead of a random one. If you don’t do this you’ll have effectively wasted a Compass. There are rewards based on exploration in each zone, but all of the non level 88 gear rewards can be skipped. I’d recommend grabbing the Gold Chests in every zone and getting the Charm/Ancient Coin exploration rewards though. The gold chests in Zone 5 of Nixied’s have some decent mid-game Destruction/Crit set gear which you could use for PvE content. The 100% reward for Zone 5 is also worth going for since it is a 5 star artifact ticket.
The current final zone, Malicus's Conciousness, should be started after you 100% Nixied 5. The two level 80 Torrent Set rightside pieces can be usable for PvE and the 2 88 pieces are solid as well (the neck only if it dodged CritC). You’ll get another 5 star artifact ticket when you 100% Zone 4 as well.
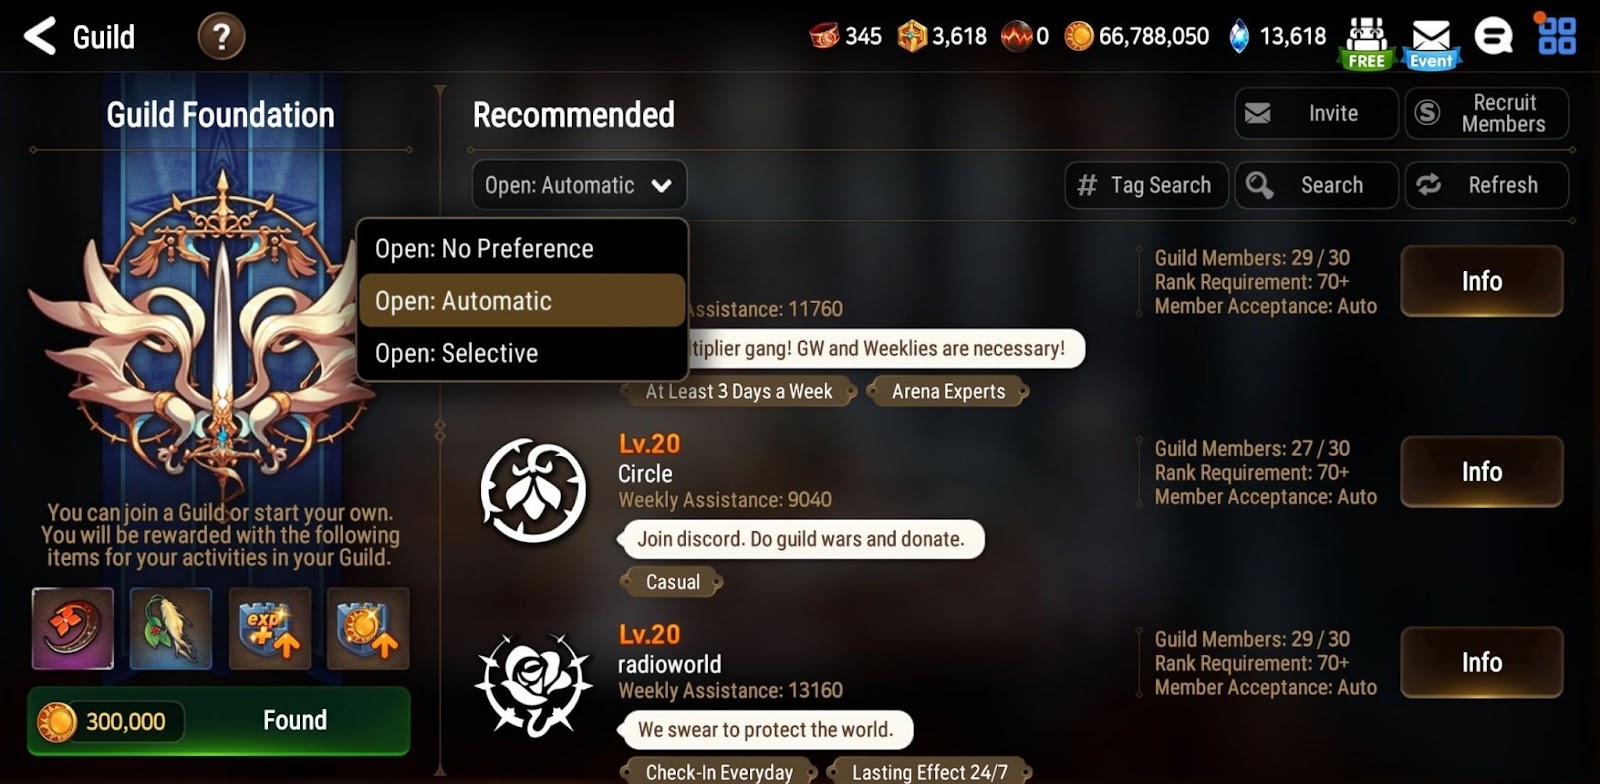
Guild
Guilds are unlocked at Rank 10. You should look to find a guild as soon as possible due to the large amount of rewards available and because you’ll need Brave Crests for Furious’s connection. This can be done by asking around in the #guild-recruitment-hall channel in the Discord, or searching in-game for guilds with Automatic acceptance enabled (make sure the guild isn’t a dead guild by checking the recent login dates of the members). Your guild currency will not be lost if you change guilds, though there is a 24h cooldown before you can join a new guild.
The Member Shop in the guild has a lot of things worth buying. There is a Molagora, Equipment Gem Conversion boxes, Artifacts Charms, and some very strong Artifacts as well. This is one of your primary sources of artifact exp. You can check the currency guide for more info on acquiring and using the 3 guild currencies: Brave Crests, Proof of Courage, and Commander’s Armbands.
Each day you should be donating the maximum amount of Gold and Proof of Courage you can, donating whatever you can for Aid, doing World Boss when it’s available, and doing Guild War when it’s available.
For Aid, your entire guild should be donating Mana Drake Claws (or the other hunt equivalent). This is because it maximizes the amount of Brave Crests that can be earned. Each member generates 120 crests as opposed to Greater Runes which only generates 100 crests and is less energy efficient to farm. Donating catalysts is also generally not a good idea, since they only generate 80 crests.
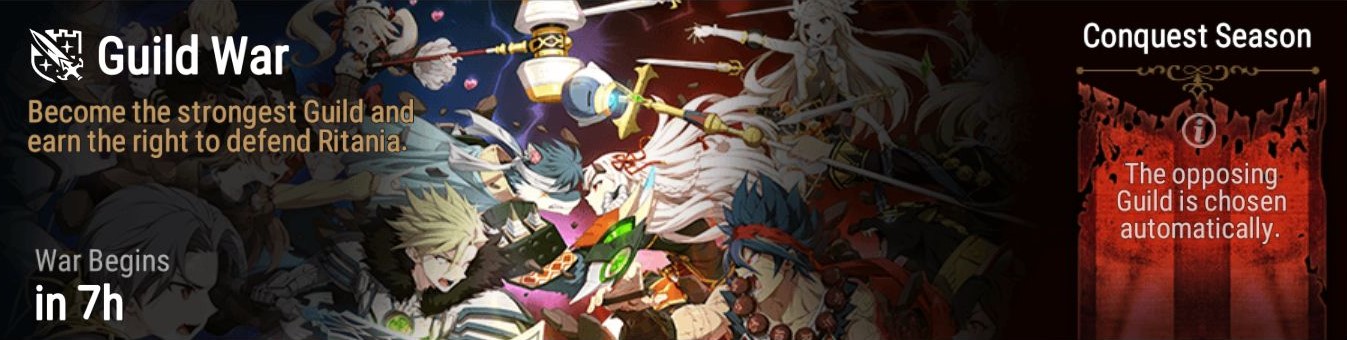
Guild War occurs on Monday, Wednesday, and Friday. Even if you don’t have a good unit and are going to lose every fight, you should still use your attacks since you’ll get some Mystics and Armbands.
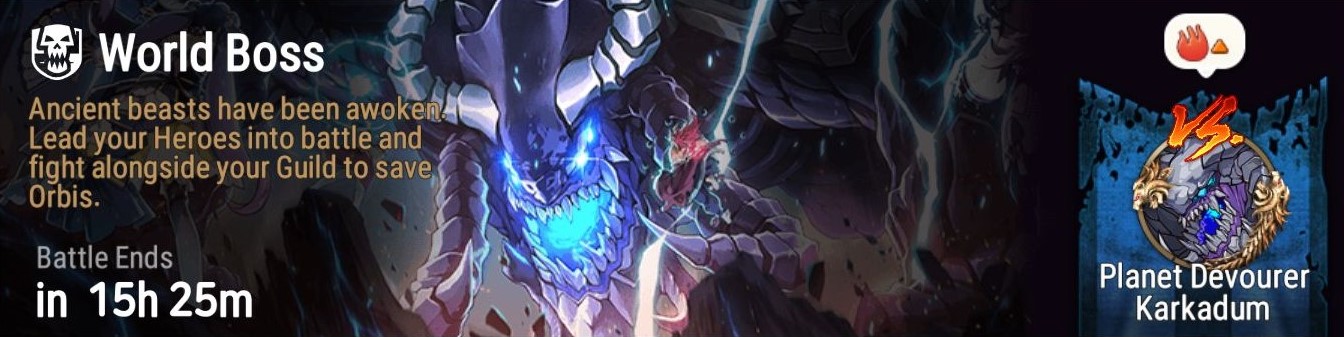
World boss is every day except Thursday. It costs 20 energy per attack for up to 2 attacks. You can get a variety of rewards from the boxes after each attack. You’ll also get a random Equipment Conversion Gem as well as a Equipment Gem Conversion Chests (where you can select the Gem) if you score high enough. The boss will reset after 3 days and you’ll get some armbands as well based on how many people used your team.
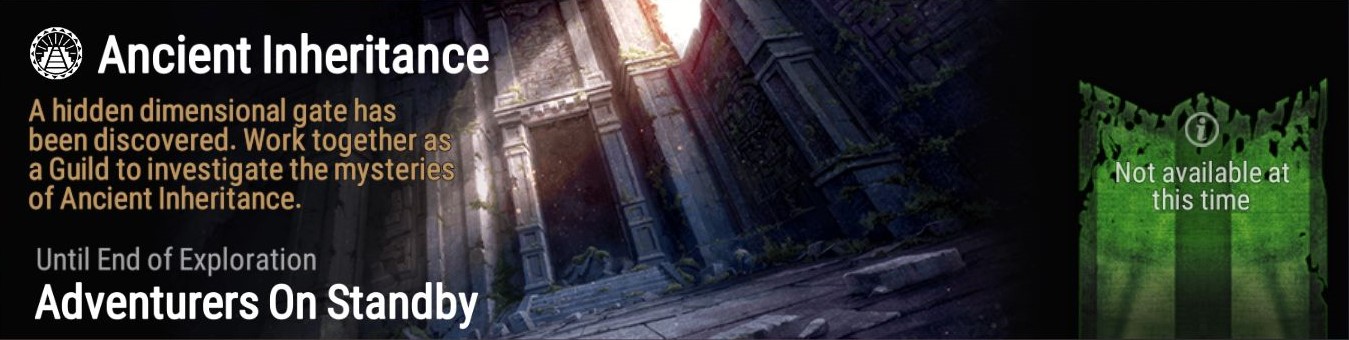
Ancient Inheritance (AI) is unlocked at rank 40. It is a collaborative guild content that is playable for 2 weeks every 3 months. All units used in AI will be boosted to level 60, 6 star awakening and +15 skill enhancement. Gear stats are heavily reduced, making AI accessible to players of any level. The rewards from AI are great and it costs nothing to play so you should participate whenever it comes around.
There is an Ancient Inheritance Guide with some general tips, team compositions, enemy skills, and a link to a live-updating map.
Spirit Altar
Spirit Altar is unlocked after clearing Ep1 2-10. Runes are used to awaken your units and to further enhance SC units. The best place to farm Common Runes is Easy difficulty. Greater Runes and Epic Runes should be farmed in Hell difficulty (or as high as you can go).
Ideally you’ll want to farm for runes during 2x Rune Buff events (this happens around once a month), but if you need runes to progress your account to Wyvern or to do something else you want to do, it’s fine to farm runes outside of buff events. The altars rotation on the schedule shown below, with all altars additionally being open during 2x Rune Buff events regardless of the day. There’s also an option to unlock a closed altar with skystones, but this is absolutely not worth it at all, just wait for the altar to unlock naturally.
|
Mon |
Tues |
Wed |
Thurs |
Fri |
Sat |
Sun |
|
Dark |
Fire |
Ice |
Earth |
Light |
All |
All |
Arena
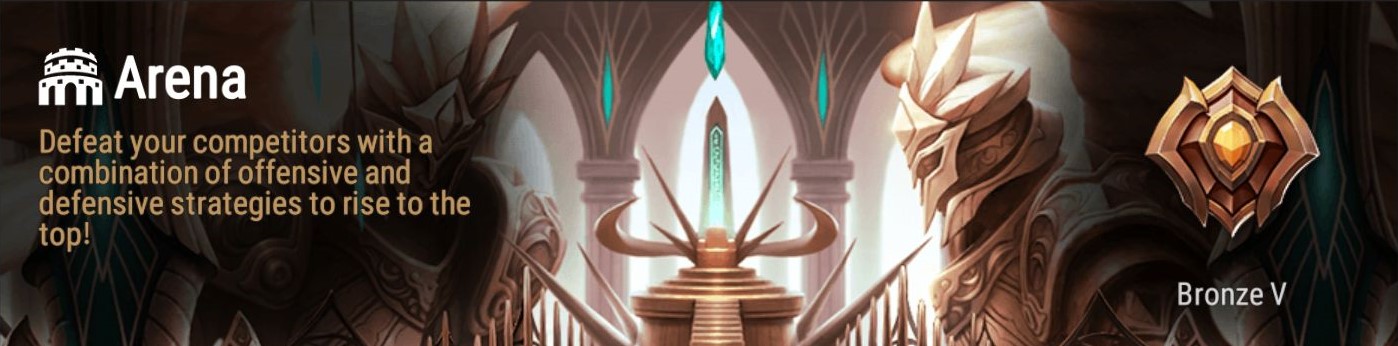
Arena is unlocked after clearing Ep1 2-10. It’s important to do this early because you get double Conquest Points during your first two weeks. Conquest points are used to buy charms for your non-accessory gears.
It can be difficult to find teams that you can actually beat early game, so the usual strat is to set a single 2* fodder as your defense and to hit people with similar defenses. You should also use the “Revenge” option on anyone who beats your defense and also has a fodder defense. Note that the “History” function shows what team was used to defeat you, and not what their defense team is. So you should check the defense team of people who attack you using the “Revenge” option.
You lose no points in Bronze for losing a defense, increasing by 2 each time you increase a full rank (Silver, Gold, etc.), so this strategy works pretty well early. Once you get a couple of units geared with the free level 75 sets, you can try hitting some weaker teams and take those out as well. I typically judge based on account rank to gauge strength though this isn’t a perfect method. If you start losing points faster than you gain them, you should swap your fodder defense to a normal defense with whatever units you have geared.
Abyss
Abyss is unlocked after clearing Ep1 2-10. You shouldn't think too hard about this in the early game. Just put your 4 best units into a team (ideally with a healer) and send them in. The Purify button at the bottom left should be used when you can’t progress anymore to receive Gold and Stigma.
There is a (WIP) Abyss Guide.
Challenge Mode is unlocked after you clear Abyss Floor 80. Similar to Adventure, each stage has 3 requirements that need to be fulfilled. There are rewards for each stage based on how many stars you’ve obtained for that stage as well as rewards based on how many stars you’ve obtained total. Floors that have already been cleared can be replayed for free, so you can clear a floor with a standard team first then go back to get the full rewards later if you want.
Pets
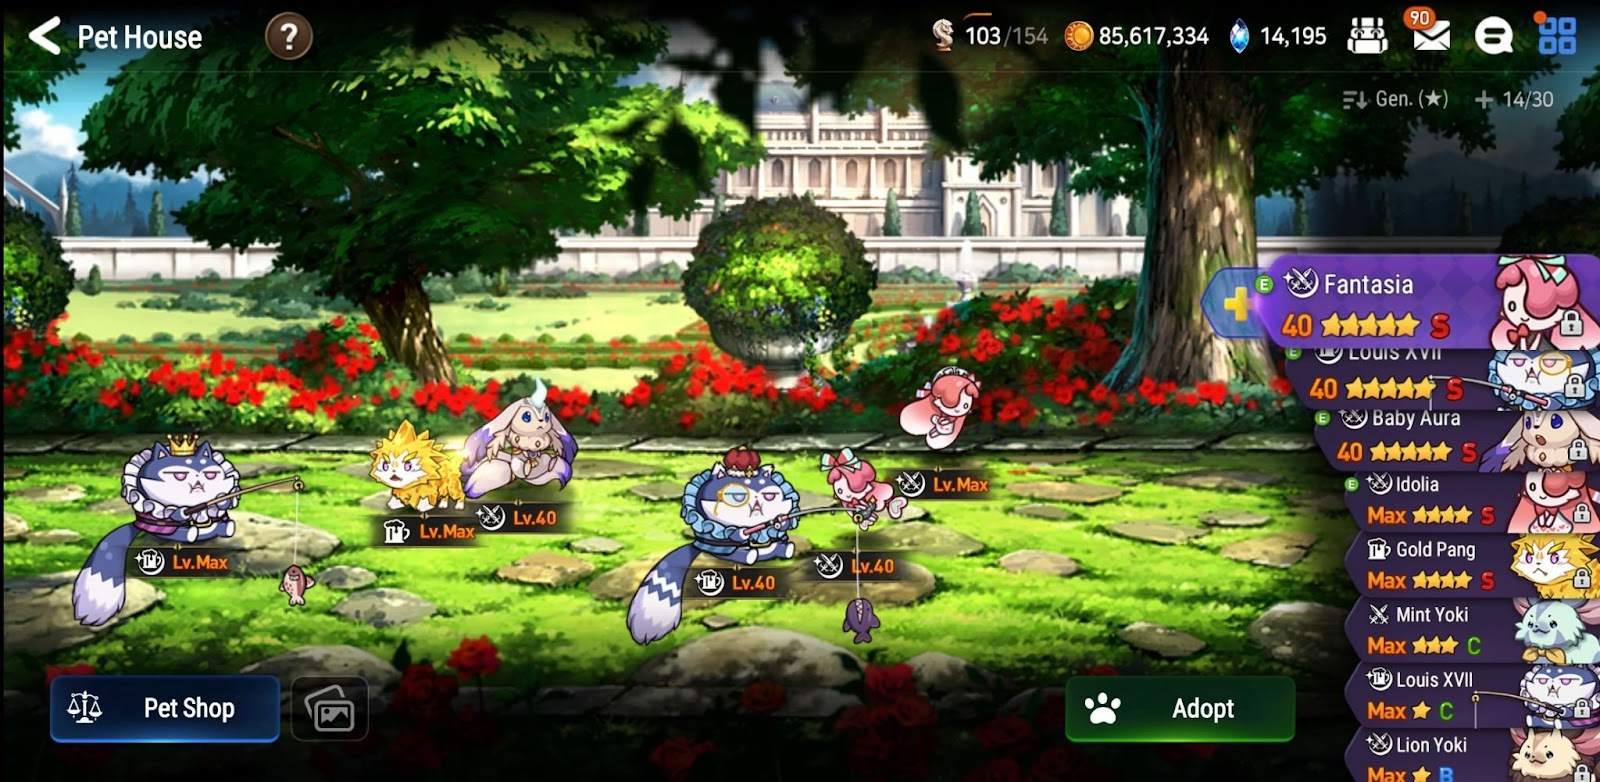
Pets are unlocked at Rank 25. They allow you to automatically repeat battles and provide various bonuses depending on their skills (they also automatically interact with objects in Adventure). This is costly to invest in early due to Pet Tickets costing gold (do not buy tickets with skystones), but you should at least do your daily summons and use any tickets you get from World Boss. You’ll want to slowly work towards building a Hunt pet as your first pet. When farming Adventure or Spirit Altar, just use any pet with a corresponding skill.
There is a Pet Guide that goes over just about everything regarding pets.
Molagora Challenge

Molagora Challenge is unlocked at rank 25. There are 3 levels to this: Easy (rank 25), Normal (rank 51 and completed Easy), and Hard (rank 61 and completed Normal). This is a permanent event and provides a wide variety of rewards, with the primary reward being Molagoras. Due to this event being permanent there’s not much of a need to rush through it, you’ll naturally complete the missions as you play the game.
One thing to note is that one of the rewards will be 10 boxes containing 700 hunt materials each. This gives you 7000 crafting materials from the hunt of your choice. You could opt to use this on Wyvern, since it is the most general hunt and would be the most likely to give you something that would help you in the early game. Many choose to use this on a different hunt instead such as Caides. Caides is a late game hunt that you won’t be farming for a long time, but it is much more annoying to farm in comparison to every other hunt and you could try to target the Penetration Set, a 2 set which is used on single target damage dealers, since you only need 4 pieces of Spd set and you’ll still need to complete a 2 set. The downside is that only Penetration would be useful for your early game and you’d need to get two pieces. It basically boils down to more useful right now vs more useful later.
Specialty Change
Specialty Change (SC) is unlocked after clearing Ep1 1-10. The most important one early game is Momo’s SC, turning her into Angelic Montmorancy (AMomo).
There is a Specialty Change Guide that goes over some general info about SCs, the general viability of each SC and how to clear the missions.
Side Story
Side Story is a button at the bottom right of Lobby with 4 different sections inside. I’ll be splitting these sections into their own parts in this guide, starting with the section that’s named Side Story. Side Story is unlocked after clearing Ep1 10-10. There are a few kinds of side stories.
A standard side story is explained via the side story “A Dear Mentor.” Everything in a standard side story shop except for the runes and the gold is worth farming for. The stage with 4 difficulties from Easy to Hell is the stage that you farm for event currency. You should always farm the highest difficulty that you can clear since it will provide the most currency per energy spent.
Upon clearing “A Dear Mentor,” you’ll receive the “Story Collection” material. This material is used for Story Summon. Story Summon can be found in the Summon section where you see all of the usual banners. This is where you can activate temporary banners for units whose side stories you have started. It costs 4 Story Collections to start a Story Summon, but the very first Story Summon unlock is free (the unlock is free, you do not get the unit for free). The Story Summon banner functions like any other banner and lasts for 7 days. 120 rolls to hit pity, 1% chance for rate up Hero, 1% chance for rate up Artifact, and the artifact is available in the Powder of Knowledge shop. Make sure you have the bookmarks to pity the unit you want before starting the banner since it only lasts 7 days. After the banner ends, you’ll have the ability to use 4 Story Collections to open the character banner again if you want to for whatever reason. The first unit you’ll want to pick up is Tamarinne, but make sure you have enough to roll any limiteds or new units that you want as well. Note that you won’t be able to put every single side story unit on the Story Summon, only a quarter of them (plus one extra).
You can also start choosing other side stories in the Side Story List at the bottom left. These are character focused side stories that will be unlocked as you progress through Adventure. Once you select another side story, you will not be able to return to any previously cleared side stories, so make sure that you have purchased everything you need from the shop. Any side stories selected from the Side Story List will remain indefinitely, so there is no rush to clear them. Every 2 weeks you will receive a “Change Ticket” which can be used to start another side story. You’ll want to make sure that you unlock any units you want, but you can also utilize the Side Story List to selectively farm catalysts that you want. Buying the catalysts from the side story shop is much more efficient than farming catalysts normally. Any newly released side stories will be added to the Side Story List immediately, but they cannot be put in Story Summon for 24 weeks after their initial banner concludes.
A special side story is a multi-week side story tied to a holiday or a collaboration event with each week unlocking a new section. Special side stories also have certain artifacts that give bonus currency when you use them on your team. These artifacts are typically acquired via the event itself or from the banner of a unit associated with the event and can be checked via the special side story’s homepage. The shops for special side stories typically come with artifacts and/or gear as well. If the artifact is a bonus event currency artifact, it should instantly be bought out to reduce the energy needed to clear the shop (unless it’s a rerun and you already have one maxed). The gear is usually good but you should double check if you’re unsure (make sure it’s at least level 78).
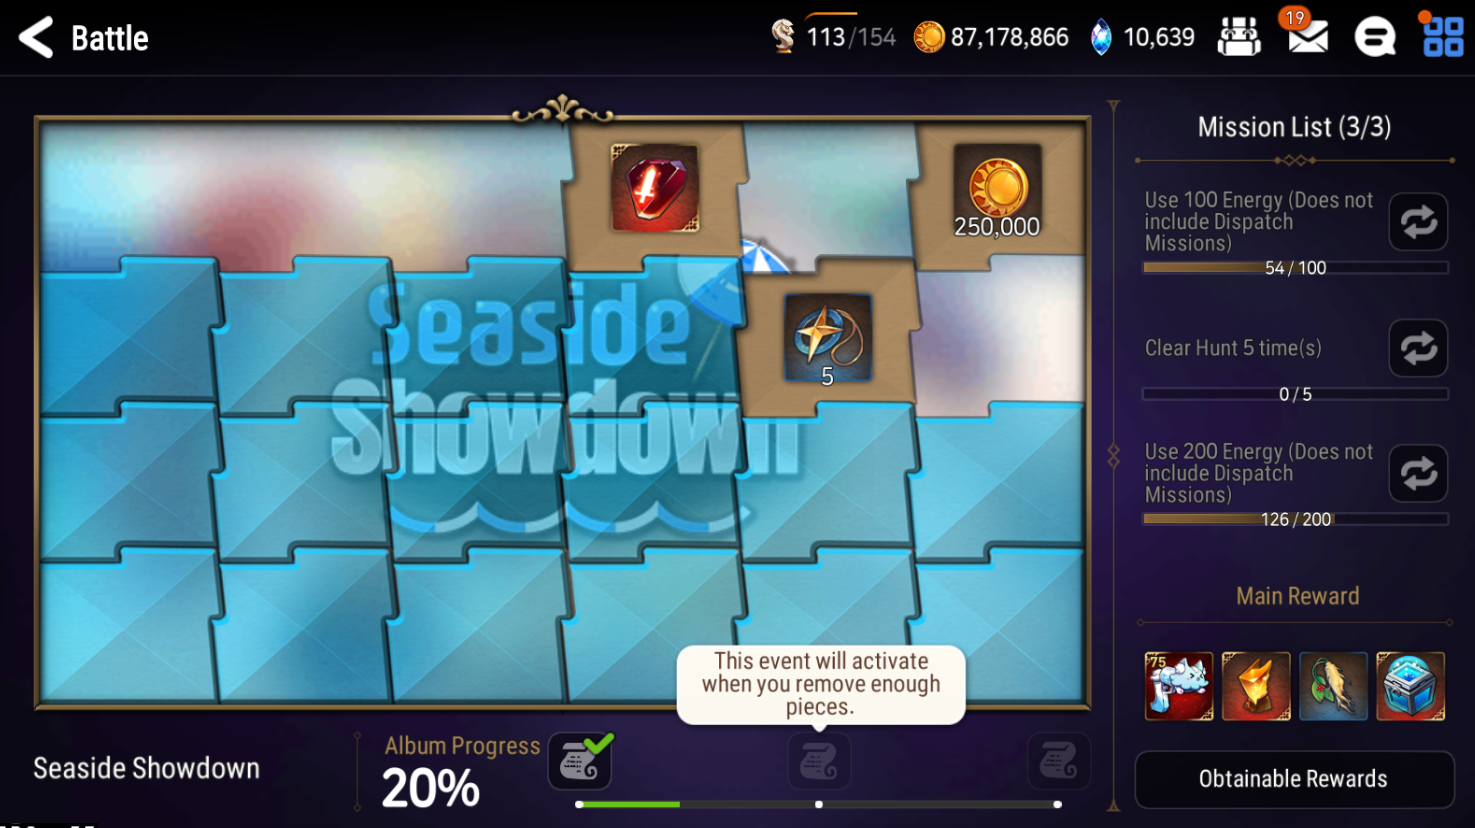
Finally, there are puzzle sidestories. Rather than using an exchange shop, puzzle sidestories have 24 puzzle pieces that can be unlocked by completing missions. These missions are really easy and you can reroll each piece’s mission 10 times for free so it’s pretty much just free stuff for little effort.
Unrecorded History

Unrecorded History (UH) is unlocked after clearing Ep1 10-10. This is one of the main locations where you will farm for catalysts to enhance your units for the rest of the game. You can follow the Catalyst Guide to see where the best spots for each catalyst are. You’ll want to fully clear out UH for your Moonlight Blessing, the SS and Mola rewards, and the Breath of Orbis. All stages have the same requirements for 3 stars, just have 3 units alive (not including friend supporter).
Grace of Growth
Grace of Growth is unlocked after clearing Ep1 10-10. This system lets you register a hero to receive a temporary boost to their level, awakenings, and skill enhances. The skill enhancement prioritizes S3, then S2, then S1. The level of the boost received is determined by certain conditions shown in the table below. The boost lasts until you unregister the hero. Unregistering a hero will make you unable to register another hero for 3 days. The waiting time can be skipped costing 5 skystones per 30 minutes remaining. You won’t be able to use the registered hero on Arena Def, GW Def, World Boss, or your profile supporter slots.
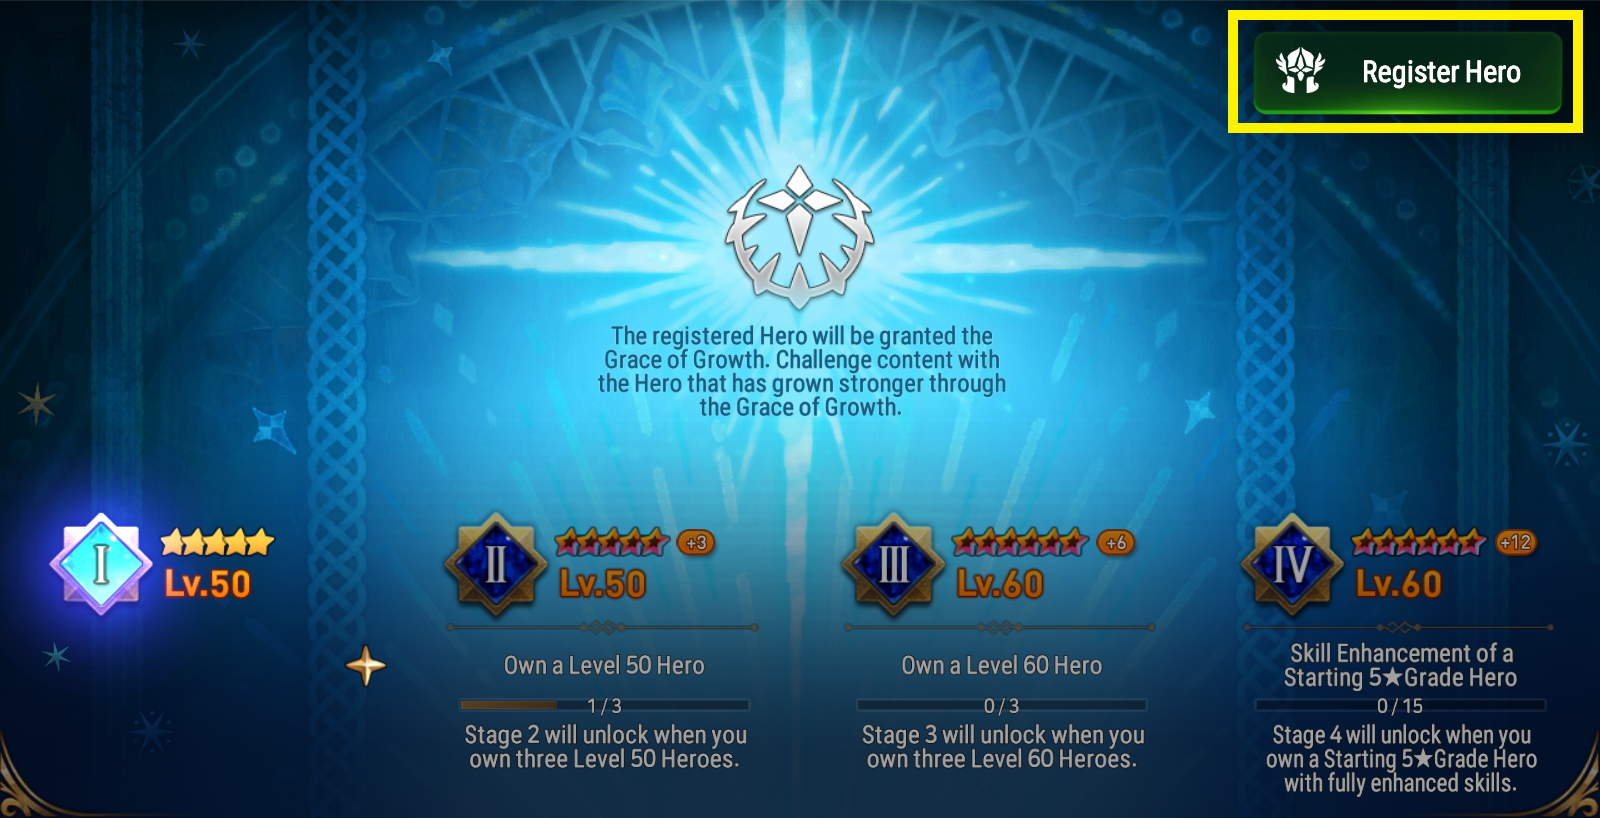
This is very useful for Abyss and Hunt one shots. Some Abyss stages can be easily cleared by units that you’ll literally never use ever again, so Grace would let you clear the floor at no cost instead of having to build a unit just for one floor. For Hunt one shots some setups also use units that are only ever used in that one spot. You can register a hero to let you one shot the hunt and unregister them when you plan on moving to a different hunt. This can cause issues if you’re the kind of person who likes to have multiple hunts set up at once. However if you’re like me and only ever farm one hunt at a time, this would be very valuable for saving resources. You could also use this to test out units in Arena, GW and RTA, just keep in mind that they’ll be missing a few skill enhancements in their S1. Supports that don’t have useful S1s could be left in Grace permanently without any issue.
Automaton Tower
Automaton Tower is unlocked after clearing Ep2 2-3. It fully resets every 2 weeks and gives a variety of rewards well worth the energy spent. After each floor, you are presented with 3 devices to choose from that buff your units. In general you should look for devices that buff your units in the long run rather than upfront effects and devices that benefit your overall unit pool. You should try to clear the highest level you can every reset, but if you absolutely can’t pass a certain stage, you can reset the tower and go to a lower level. You won’t need to spend energy to clear floors you’ve already cleared and you won’t get rewards for said floors either (this doesn't apply to the biweekly reset which is a complete reset). You shouldn’t bother building units specifically for this, just use whatever your strongest units are and if you have the unit pool, shift them around depending on what devices you get.
Hall of Trials

Hall of Trials (HoT) is unlocked after clearing Ep2 4-10. It gives you access to unit-specific Exclusive Equipment (EE) that can upgrade certain unit’s skills and give them a bit of stats. Each unit that has an EE has 3 different EEs and the EE you get is random when purchased. When it comes to purchasing EEs early game, don’t worry about the main stat and just focus on getting the right upgrade. You can craft EEs in the Alchemist Steeple where you’ll be able to select the EE you want and get a maxed main stat. This costs 7 EEs with a maxed Steeple. There are also some exclusive artifacts you can purchase, namely Iela Violin and Sword of Ezera, but neither are relevant early and should be saved for later.
You can get HoT currency by doing as much damage to the boss as possible before dying or killing the boss. It costs nothing to try so you should always send in your best team and do at least 1 attempt per rotation, even if you don’t score very high. You’ll also get some currency from the Hunt Expert Challenge (explained below).
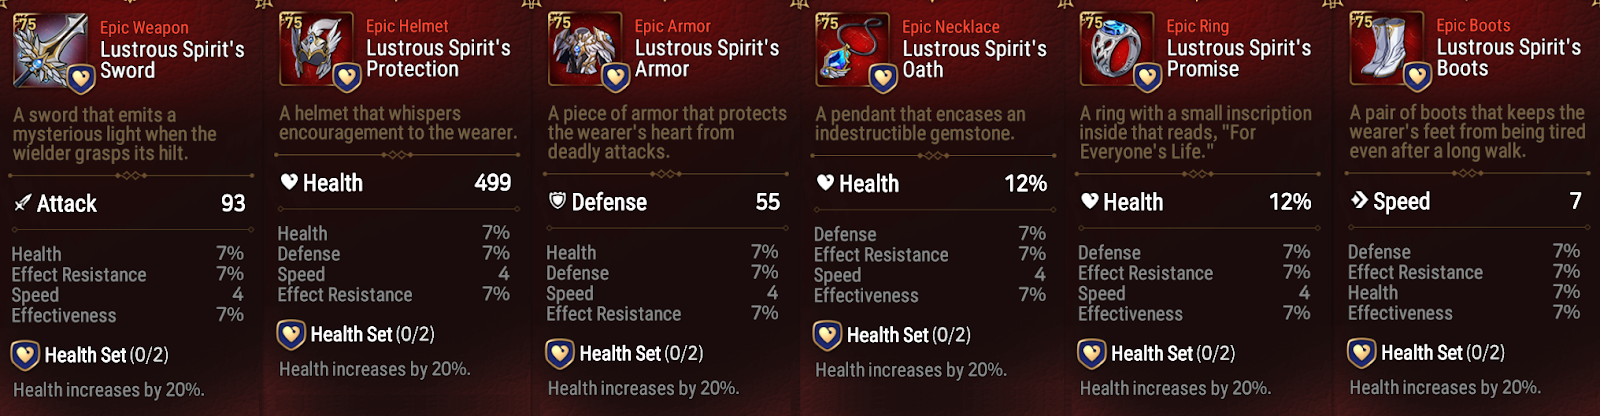
Hunt Expert Challenge
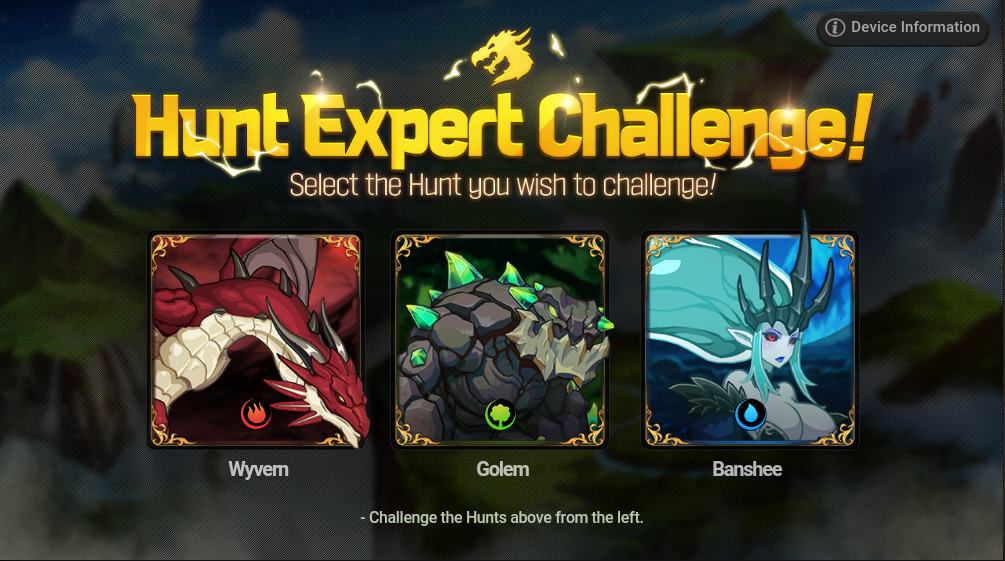
Hunt Expert Challenge is unlocked after clearing any hunt level 6 for the first time. If you haven’t done so yet, clear Wyvern 6. Make sure you pick the Wyvern Hunt Expert Challenge (it is very easy to pick the wrong one so be careful). After you clear the first set of missions, you’ll get Sigret and 6 Daydream Jokers (DDJ). Keep 2 separate DDJs (3 if you don’t have Song of Stars or Infinity Basket) and fuse the remaining DDJs into one DDJ to put on Sigret.
Clearing the first set of missions will unlock a second set of missions. In the second part of the Hunt Expert Challenge Missions, you can get the remaining awakening catalysts for Sigret, a second free HP set, a second free Atk set, and HoT currency. Both of the free sets obtained here are worth leveling and you will use them for W13 and mid game PvE progression. The new Atk set can go on Sigret and you can use her as a secondary DPS if needed while farming. The new HP set’s boots are needed for AMomo and the other pieces can replace any badly rolled pieces from the first HP set. The HoT currency, as well as any currency gained from playing HoT normally, should be used to get Sigret’s 2nd EE, 20% extra Bleed chance on S1.
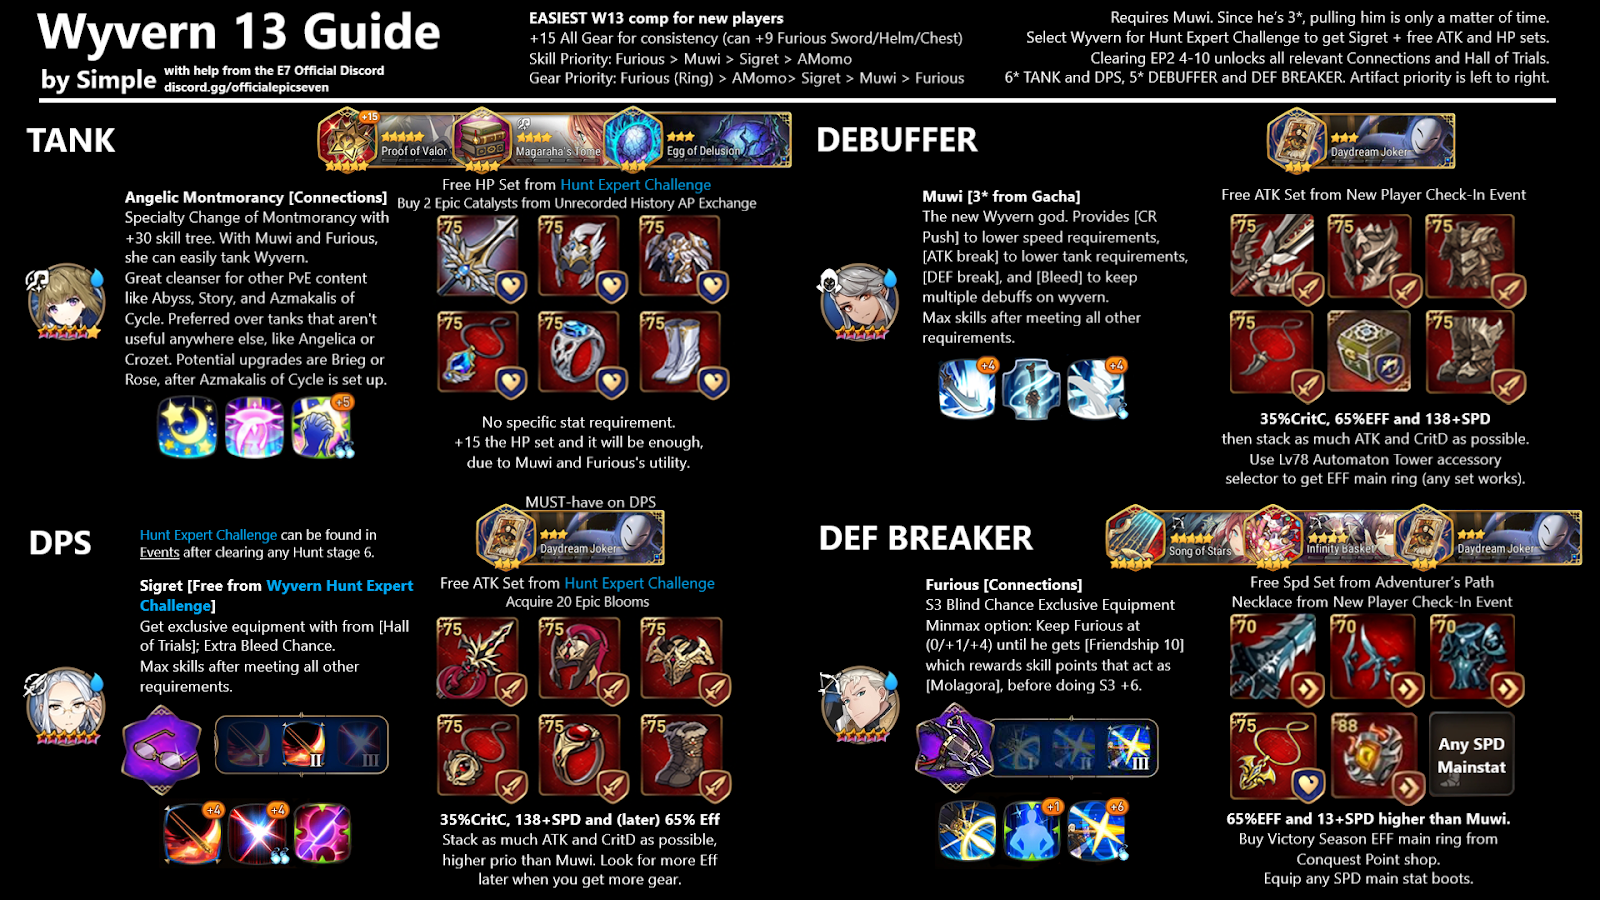
Wyvern 13 (W13)
It’s now time for you to start working towards Wyvern 13. As mentioned earlier, Speed Set is the most universally usable set, making it the best to farm early game since it’ll let you build a lot of units despite only farming one location. The other two sets are useful for pushing Mid Game PvE content and can be used in PvP as well.
Speed (Spd) set increases spd by 25%. This set is used on all kinds of tanks, DPS and Bruisers. You’ll be relying on this set to gear most of your units as it is the most versatile.
Critical (Crit) set increases Critical Hit Chance (CritC) by 12%. This set is used on DPS and Bruisers as the second set. It has competition from some other 2 piece sets later on, but for now this should be the main set you use since you can get it while farming Spd set gear.
Hit set increases Effectiveness (Eff) by 20%. This set is used on tanks with debuffs and a few PvP DPS that are reliant on landing debuffs to deal damage. You can also use this on PvE debuffer/DPS to help them reach the necessary Eff.
The general beginner W13 team is shown in the graphic below. This setup lets you farm W13 with 3 free units and nothing but free gears. The 4th unit is a base 3* that you’ll need to pray you roll at some point, but due to his low rarity it shouldn’t be too hard (hopefully). Direct link here for easier reading.
There is a Wyvern 13 Guide that goes over the mechanics of the fight, the reasoning behind the unit choices, and what to use if you don’t have Muwi. The section below explains exactly how you’ll move towards W13 in detail.
While preparing for W13, you should keep your main DPS gear on FSTieria since she’ll still be your main farmer. You should also get Furious from Connections and finish Momo’s SC if you haven’t done so. Your final unit will be Muwi, but if you haven't managed to roll him, you can temporarily use Clarissa, SSB or Alexa. Alexa is the free option, but it’s very hard to clear W13 with her and you’d likely just farm W12 instead until you roll Muwi.
To finish up your Wyvern preparations, you should farm catalysts in UH for your Wyvern team and any future units you want to build. This will also give you the exp needed to level your units and fodder, as well as some gray and green gear to use as gear exp. You can get additional gear exp from the Ancient Coin shop and the Conquest Point shop. The last 3 pieces of gear you’ll need are the Spd set Eff main ring from the Conquest Point shop, any Eff main ring (such as from Auto Tower), and any Spd main boot. The Spd main boot can be acquired from Arena Shop Conquest Season or for a more budget option, the Gold Chest in Ep1 10-3.
Once you feel like you’re ready to tackle Wyvern, you should move your free Atk set from FST over to your secondary DPS for Wyvern and make sure Sigret has the better DPS gear between the two. Any other necessary gear that you put on other units should also be moved over. You can put gear on FSTieria again after you manage to farm some gear from Wyvern.